Finally, it’s time!
You’re about to take the first step down an entire new path filled with opportunity. Blogging has unlocked so many benefits for my own life (and it will do the same for you).
You might be feeling a lot of uncertainty – the excitement and anxiety that early explorers felt setting sail to discover new worlds. But, don’t worry. I’m here to guide you every step of the way and make sure it all goes smoothly!
 No matter what your age, race, creed, or socioeconomic background, you’ll quickly set up a blog after going through this simple guide.
I know that you might not be very tech savvy. That’s why I’ve explained exactly what you need to do to get your blog up and running.
If you feel confident with your tech skills, you can set up your wordpress blog yourself (and just take advantage of my special discount offer).
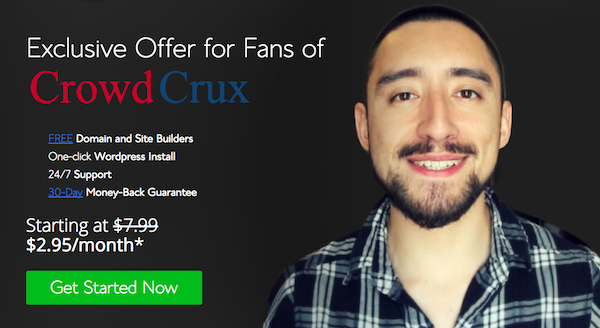
Bluehost is the cheapest and most secure way to set up a WordPress blog and they’ve given me access to a special discount for my audience. When you sign up today, you’re getting:
- Free domain and site builders
- One-click wordpress install
- 24/7 support
- 30 day money back guaranee
This is all for the ridiculously low price of $2.95 per month. That’s less than ten cents per day to have your professional blog up and running with virtually zero downtime.
Anything cheaper than that and you’re gonna be sacrificing the quality of your web server. It will be prone to hackers, traffic overload, bad coding, and downtime.
Pretty much, this is the ONLY investment you’re gonna have to make to get your blog up and running. After that, it’s smooth sailing. You’ll be able to install themes and WordPress plugins for FREE. This will make your website look well-designed, slick, and sexy.
Last year, I was able to generate more than $80,000 from my blog in the form of advertisements, affiliate marketing, sponsorships, and digital products. Most of this is passive income.
Literally, anyone can make money from blogging. Whether you wanna earn some extra cash from home, support your family, or become a digital nomad, blogging is the straightest path to get you there.
I can’t tell you how exciting it was to earn my first $100 from my blog. It felt like I had stumbled on magic money. I was actually getting paid to write articles online. I was doing what I loved and making money at the same time. I knew after that point, that all I had to do was write more. The income would grow.
Soon, that $100 turned into $1,000, then $5,000, then $10,000! I couldn’t believe it. It worked, just the way everyone said it would. This was a heart-stopping moment in my life and one that I’ll never forget. I was sitting at my kitchen table just staring at my computer screen, thinking “wow.”
After you grab a hosting package, you’ll quickly make your money back, so that everything going forward is pure profit. To move forward, all you gotta do to start your blog is sign up for the $2.95 per month package that includes simple WordPress install features, a 30 day money back guarantee, and 24/7 customer support. If you sign up for a year long plan, you’ll save some money.
What about Blogger, Medium, and other blog hosting sites?
You might be tempted to with with a free hosting site like Medium or blogger. You might even just think about publishing articles on LinkedIn. This is the WORST thing that you can do.
Income and success as a blog is directly tied to your own website. You need your own blog hosted on Bluehost if you want to start making money from blogging. This is the best possible decision that you can make when getting started.
Sites like medium lump your content together with a bunch of other bloggers, making it very difficult to stand out. Other writers and businesses won’t take you as seriously. They’ll classify you as a “hobbyist” who’s not really serious about the craft.
Not to mention that it’s virtually impossible to monetize a blog on Blogger or Medium. You can’t install your own advertisements, affiliate links, or offer digital products for sale. You are powerless to do anything besides write.
The reason that I use Bluehost is that they’ve been a reliable and dependable hosting provider for my website since 2012. I’ve used them to scale a blog to millions of readers (and thousands of dollars in revenue). It’s the secret engine behind everything that I do online.
It’s a complete no-brainer because you’re getting a ton of stuff when you use these guys. Some of these goodies include:
- 24/7 Support and Assitance
- WordPress and Site Maintenance Experts
- Over $175 in FREE offers to help you grow your blog
- One-click WordPress Install
- Optimized hosting for wordpress
- 30 Day Money Back Guarantee
To follow my guide down below, you gotta head over and get set up with Bluehost. I know there are tons of hosting companies out there, but you’re seriously gonna love these guys. They make this whole process of setting up a blog so much easier.
You can continue with the setup process by clicking the link down below. Should you have any questions, shoot me a message! Leave a comment or send me an email. You can also contact a support representative. Either way, you’ll get this blog up and running quickly without any hassle.
1. Register Your Domain Name
The first thing that youre going to need is a domain name for your blog. This is what people will type in the address bar to come across your website.
You can get your domain name right here and start the blog.
It took me a while to settle on the domain name for my blog. I created a list of ideas and eventually settled on CrowdCrux because all of the other ones were taken.
The first part of the name crowd was going to be the focus of this blog crowdfunding. Its actually transformed into much more than that.
Now, I talk about building a crowd in general. How do you market your products, get your name out there, and grow a tribe of people who know, like, and trust you.
I chose the next part, crux because I wanted this website to be a hub of free educational content that people to use to get funding, grow their sales, and succeed in online business.
You can claim your domain name directly with Bluehost.
Youll just have to pick which package youd like to go with. All of the packages (when you use my special link) will unlock a discount for you.
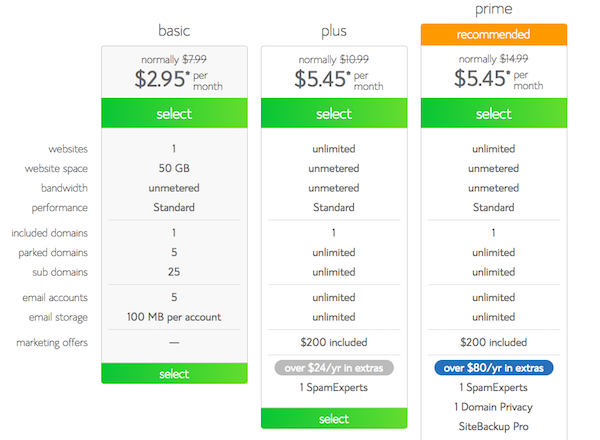
Im using one of the more expensive tiers because I want access to SiteBackup. I also have multiple websites hosted on my account.
The more that you grow your blog and your business, the more youll want to re-invest back into the company. Its the formula for longterm growth.
Once you select your tier, you can either:
- Claim a NEW domain name
- Assign your existing domain name
- Wait until later
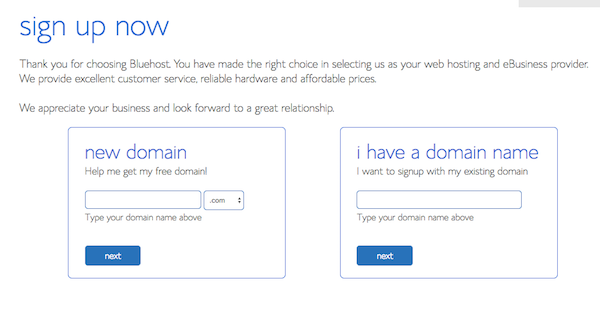
Lastly, youll just have to put in your standard information and finalize your order. Youll get the best possible pricing if you elect to choose the 36 month pricing package, at $2.95 per month or a total of $106.20.
This is one of the smartest decisions you can make. Ive been with these guys for over 5 years and I wish I did this when I got started.
2. Buy Hosting For Your Blog
If you already have a domain name, or you didnt go through every step above, youre now going to have to buy hosting for your blog.
I know hosting shouldnt cost money, right?
Like everything should just be FREE, right. Ughhh!
The problem with a service being free is that there is NO customer service, TERRIBLE product quality, and POOR upkeep/updates.
Quality solutions cost a little bit of money, because they are quality!
How annoying would it be to have your website down all the time?
Wouldnt it suck to have no help setting up your site?
I dont know about you, but I hate outdated software. Its clunky, buggy, and doesnt work well. Thats why I invest in robust hosting.
Lets be honest, the $2.95 per month special price for the 36 month package is NOT going to break the bank. You really only need the basic plan to get started.
Usually, this hosting would cost a whopping $287.64 for the same timeframe. Today, youre getting more than 50% off that price, which comes in at $106.20.
Of course, if you wanted to, you could figure it all out yourself. You could download the WordPress open source code base, figure out how to upload it to a server, and deal with all the troubleshooting yourself.
That option comes with a price your time (and sanity)!
This blog hosting provider has a one-click WordPress install feature, so you dont have to deal with any of that. It just works.
But, I dont take for granted the decision you have in front of you now. Should you start a blog, should you hold off?
What if it doesnt turn out the way you want? What if youre not able to earn income? What if people laugh at you online!
I had all of these same worries, apprehensions, and fears when I got started. I thought that people were going to leave angry comments and make fun of me.
I can say unequivocally that this will be the BEST decision of your life. Not only can you earn good income and get free traffic, but if you pour your heart and soul into your content, people will love it!
I very rarely get a troll, and usually, the claims they make are so outlandish that its easy to just ignore them.
Blogging has allowed me to live a lifestyle where I can work from home (or anywhere), grow my revenue, drive traffic to new products, and instantly get credibility online.
Having one or two weird trolls a year is a small price to pay for the upside.
When youre ready to start the blog, here are the steps for buying hosting:
- Go to Bluehost and click the green get started now button.
- Pick the package youd like to go with
- Enter your desired FREE domain name (or assign one you already have)
- Put in your contact or business info
- Pay for your package
- Youre done!
3. Connect your domain name to your hosting account
If you followed my steps in point #2, you dont have to pay attention to this section. You can skip it!
However, if you have a domain name with GoDaddy, 1&1, or some other registrar, youre going to have to assign this domain name to your Bluehost hosting account.
Its pretty easy to connect it. All you need to do is change your name servers (DNS) to:
- ns1.bluehost.com
- ns2.bluehost.com
The easiest way to do this is just to google how to change name servers for the domain registrar that you used. You could also google how to connect Bluehost with
Once you change these name server entries on GoDaddy or 1&1, you just need to log into your Bluehost account, go to the addon domain tab, and add the domain to your account.
I know that this might seem overwhelming, but thats why were using this hosting provider. They have 24/7 support!
Not only do they have a step-by-step outline of how to do this, but you can also call them up at any time and get guidance. You can even chat with them online.
These are the basic steps, summarized:
- Assign your GoDaddy, 1&1, or other domain name to Bluehost by pointing your DNS nameservers to ns1.bluehost.com and ns2.bluehost.com.
- Add your domain to the Bluehost hosting account by going to the addon domain section.
- Youre all good to go!
4. Install WordPress on Bluehost
WordPress is the backend dashboard of your blog. Its responsible all of the functionality like:
- Publishing blog post
- Managing comments
- Generating visitor statistics
- Handling the theme or appearance of the blog
- Uploading images, videos, and more.
Youre getting this all free! It works right out of the box. All you have to do is turn it on.
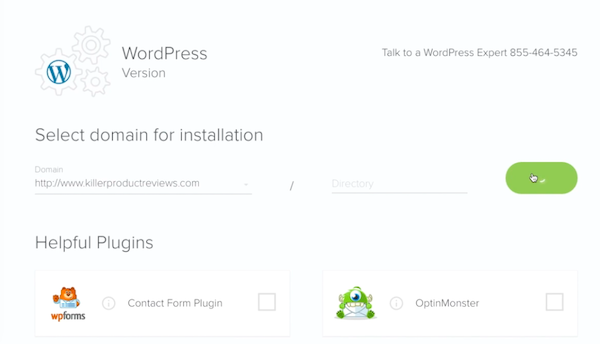
This literally takes seconds to install, thanks to the Bluehost one-click WordPress install feature. To get started, youll just click the one-click install feature from your cpanel menu.
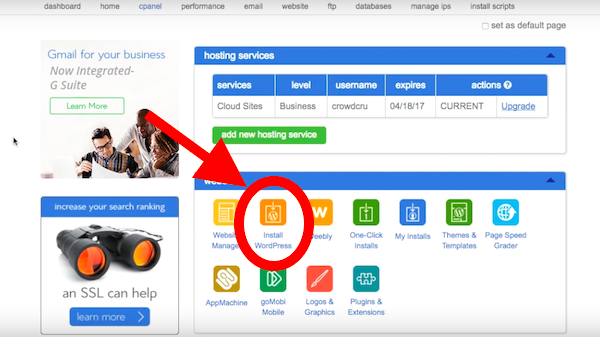
Then, youll pick the domain name that you want to install this on. Its as easy as that! Make sure that you choose the correct domain name if you assigned multiple to your account.
While this is pretty simple, you can also get help and talk to a WordPress expert at any time. Just call the number and youll get in contact with a member of their support team.
After you choose the primary domain name that youll be using for your blog, you just gotta enter some basic info, like the site title, etc.
You can always change this information later. Ive changed my password over the years for security reasons and I have also changed the website title.
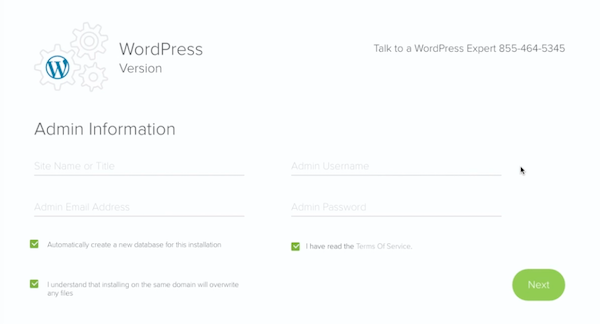
Remember, write down your username, password, and email address that you enter on this screen. Youll be using this information later to log in to WordPress. You dont want to lose it.
And .. boom! Youre done.
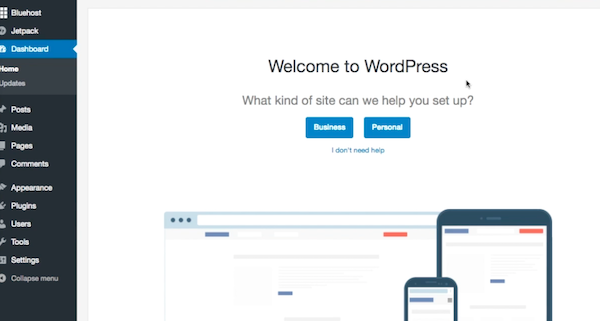
When you log in using your created username and password, your screen will look like the one below.
That wasnt so bad, was it?
Before I leave you, I want to give you a quick primer on how WordPress works, so that you can get started blogging right now.
All of the main functionality for the WordPress dashboard is found on the left side of the screen. The top bar sort of functions as short cut links for common actions, like creating a post.
Basic WordPress terminology and vocabulary:
- Post: This is the actual blog post text. When you create a post, youll enter a title, message, and insert any media that youd like. You can easily format it and see the chances in real time. Posts include categories, tags, and often times, a featured image.
- Page: The main difference between pages and post is that a post is a single piece of content, which resides in a certain category or in your post achieve. A page is a static page of your website, like your about page, and is usually found via your navigation menu.
- Comments: These are the responses that people write to you after reading your posts or pages. You can read through them, respond to them, and moderate them.
- Media: This is all of the images, video, and multimedia content that you use on your blog. You can insert this content into posts, pages, or link to it directly.
- Plugins: I was confused about these at first. Basically, plugins are little bits of code that you can install that will expand the functionality of your website beyond the standard WordPress functionality.
- Appearance: This is where the look and feel of your blog can be controlled. You can install free or premium WordPress themes to make your blog look more professional.
- Widgets: These will show up in the sidebar or other areas of your blog or website. You could put popular posts, archives, or subscription forms in your sidebar by the use of widgets.
When youre just getting started with WordPress, the first features that usually snag your attention are themes and plugins.
 You can browse the free WordPress marketplace to look at all of the different themes that you have available to you.
At the same time, as we discussed before, free does come with a price. Usually, free themes are not very professional looking. Theyre kind of amateur.
This is one reason that I recommend investing in a premium theme to make your website look like it cost thousands of dollars to make.
In reality you probably only spent $50 on a nice-looking premium theme.
A marketplace like Themeforest is an amazing source of high quality premium themes. You can download most of them for between $20 $50. Epic!
I actually used Themeforest to get a website theme for my personal blog. It looks amazing.
I hope youve found this step-by-step tutorial to be helpful!
For me, starting a blog has been a career-shifting decision that has led to so many incredibly opportunities.
If you want to get free traffic, grow a loyal following, and earn consistent income online, then youre making the right decision!